


How to Apply Graphene Coating for Lasting Protection
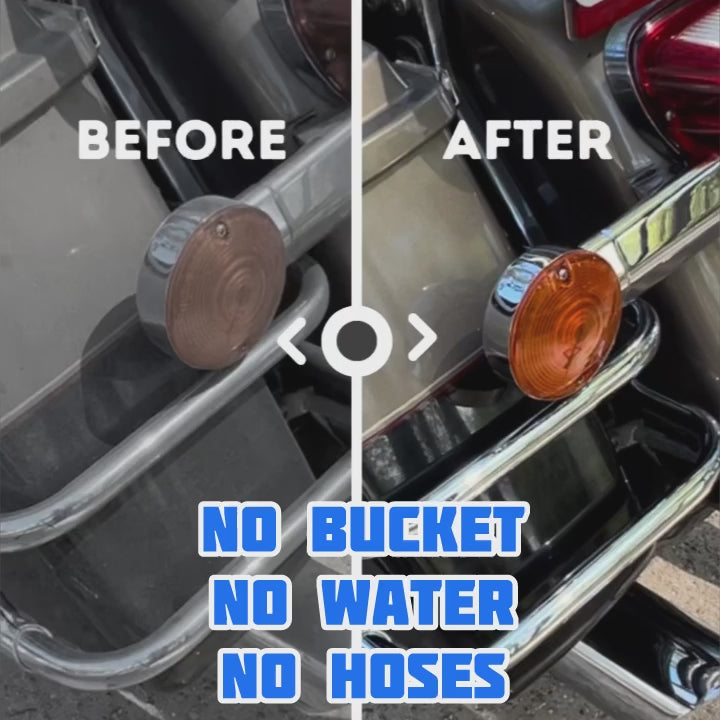
Graphene coatings are taking surface protection to a whole new level. Some products boast up to five years of protection with just a single application. Sounds almost too good to be true, right? Yet most people overlook that nailing the prep and application steps is what actually determines how long that showroom shine will last.
Table of Contents
- Step 1: Gather Necessary Tools And Materials
- Step 2: Clean The Surface Thoroughly
- Step 3: Prepare The Graphene Coating Solution
- Step 4: Apply The Graphene Coating Evenly
- Step 5: Allow The Coating To Cure
- Step 6: Test The Coating For Quality And Durability
Quick Summary
| Key Point | Explanation |
|---|---|
| 1. Gather essential tools and materials | Collect microfiber towels, isopropyl alcohol, and applicator pads for effective graphene coating application. |
| 2. Clean the surface thoroughly | Use isopropyl alcohol and a clay bar to remove contaminants before applying the coating for better adhesion. |
| 3. Prepare the graphene coating solution | Mix according to manufacturer instructions under controlled conditions to ensure an effective protective layer. |
| 4. Apply the coating evenly | Use a systematic approach with an applicator to achieve uniform coverage; thin layers enhance durability. |
| 5. Allow proper curing time | Maintain stable conditions for 12 to 72 hours to ensure optimal bonding and coating performance before use. |
Step 1: Gather Necessary Tools and Materials
Applying a graphene coating requires meticulous preparation and the right set of tools to ensure a professional and long lasting finish. Before starting the application process, understanding what materials you need will help you achieve optimal results and protect your surface effectively.
For a successful graphene coating application, you will need several essential tools and materials. Start by collecting a comprehensive toolkit that includes microfiber towels specifically designed for ceramic or graphene coating applications. These towels are critical because they prevent scratching and help achieve a smooth, even surface. Select microfiber towels with a tight weave and minimal lint to ensure the best possible outcome.
Next, gather your surface preparation materials. You will need high quality isopropyl alcohol (90% concentration or higher), lint free cleaning cloths, surface clay bar kit, and potentially a surface decontamination spray. These items are crucial for creating a clean, smooth surface that allows the graphene coating to bond properly. Thorough surface preparation determines how well the coating will adhere and how long it will protect your surface.
Your coating application kit should include specialized applicator pads designed specifically for graphene coatings. These pads are typically made from microfiber or foam and help distribute the coating evenly without leaving streaks or uneven patches. Consider purchasing multiple applicator pads to ensure you have clean tools throughout the application process.
Protective gear is another important consideration. Wear nitrile gloves to protect your hands and safety glasses to shield your eyes from potential chemical splashes. Work in a well ventilated area with consistent temperature between 60 70 degrees Fahrenheit for the best application environment.
Finally, select a high quality graphene coating product that matches your specific surface requirements. Check out our guide on motorcycle maintenance to understand how proper preparation impacts coating longevity. By gathering these materials and preparing your workspace meticulously, you are setting the stage for a successful graphene coating application that will provide lasting protection and an impressive finish.
Below is a table summarizing all essential tools and materials for graphene coating application, along with their specifications and specific purposes.
| Tool/Material | Specification/Type | Purpose |
|---|---|---|
| Microfiber Towels | Tight weave, low lint | Prevents scratching; ensures smooth application |
| Isopropyl Alcohol | 90% concentration or higher | Removes contaminants and residue |
| Lint-Free Cleaning Cloths | Non-abrasive, high absorption | Streak-free surface cleaning |
| Surface Clay Bar Kit | Professional grade | Removes embedded particles and surface impurities |
| Decontamination Spray | pH balanced | Prepares surface for optimal bonding |
| Applicator Pads | Microfiber or foam, multiple pads | Even distribution of graphene coating |
| Nitrile Gloves | Disposable, chemical resistant | Protects hands during application |
| Safety Glasses | Splash resistant | Shields eyes from chemicals |
| Graphene Coating Product | Matched to surface needs | Provides lasting protective layer |

Step 2: Clean the Surface Thoroughly
Thorough surface cleaning is the foundation of a successful graphene coating application. This critical step ensures that your surface is completely free from contaminants, oils, dirt, and previous residues that could interfere with the coating’s adhesion and performance. Skipping or rushing through this stage can compromise the entire protection process.
Begin by selecting the right cleaning solution for your specific surface. High concentration isopropyl alcohol works exceptionally well for most surfaces, providing a deep clean without leaving residual moisture or chemical traces. Pour the isopropyl alcohol onto a clean microfiber towel rather than directly onto the surface to control application and prevent oversaturation.
Learn more about deep cleaning techniques that can enhance your surface preparation. When cleaning, use a systematic approach by working in small sections and using linear motions rather than circular patterns. This technique ensures complete coverage and prevents potential swirl marks or uneven cleaning.
For surfaces with stubborn contaminants, you might need to employ a clay bar treatment. Gently glide the clay bar across the surface with light pressure, using a lubricant to help it pick up embedded particles. This process removes microscopic impurities that standard cleaning methods might miss. After clay bar treatment, immediately follow up with another isopropyl alcohol wipe to remove any clay residue and prepare the surface for coating.
As you clean, pay special attention to areas prone to accumulating dirt and grime. These might include corners, seams, and textured regions where contaminants can hide. Use multiple clean microfiber towels during the process to avoid reintroducing dirt onto the surface you’ve already cleaned.
To verify your cleaning is thorough, perform a final white towel test. Wipe the surface with a clean white microfiber towel and inspect it closely. If the towel remains completely white with no discoloration, you’ve successfully cleaned the surface and are ready for graphene coating application.
If any dirt appears on the towel, repeat the cleaning process until the towel remains pristine.
Precision and patience during this cleaning stage will dramatically improve your graphene coating’s performance, ensuring a smooth, long lasting protective layer that looks professional and provides maximum protection.
Step 3: Prepare the Graphene Coating Solution
Preparing your graphene coating solution requires precision and careful attention to detail. This critical step determines the effectiveness and durability of your protective layer. Understanding how to mix and handle the coating solution will directly impact the final result and longevity of your protection.
Temperature and environment play a significant role in solution preparation. Work in a controlled environment with consistent temperature around 68 to 72 degrees Fahrenheit. Extreme temperatures can alter the coating’s molecular structure and compromise its bonding capabilities. Choose a clean, dust free workspace with minimal air movement to prevent contaminants from interfering with your application.
Before opening your graphene coating product, gently shake the container to ensure uniform distribution of particles. Some graphene coatings settle during storage, and proper mixing prevents uneven application. When you explore our motorcycle graphene coating solutions, you will notice specific manufacturer instructions for mixing.
Carefully measure the coating solution according to the manufacturer’s recommended ratio. Use disposable measuring tools to prevent cross contamination and ensure accurate proportions. Most graphene coatings require precise mixing to maintain their protective properties. If the solution appears too thick, do not add water or other solvents without manufacturer guidance.
As noted in scientific research, graphene coating solutions require uniform dispersion to prevent particle aggregation. This means mixing slowly and consistently to create a homogeneous solution. Use clean, lint free applicator tools and avoid introducing air bubbles during the mixing process.
To verify your solution is ready, perform a visual and consistency check. The graphene coating should appear smooth and free of clumps or separation. When you tilt the mixed container, the solution should flow evenly without streaking or uneven coloration. If you notice any inconsistencies, remix the solution carefully or consult the manufacturer’s guidelines.
Remember that proper preparation sets the foundation for a successful graphene coating application. Take your time, follow instructions precisely, and maintain a controlled environment to achieve the best possible protective results.
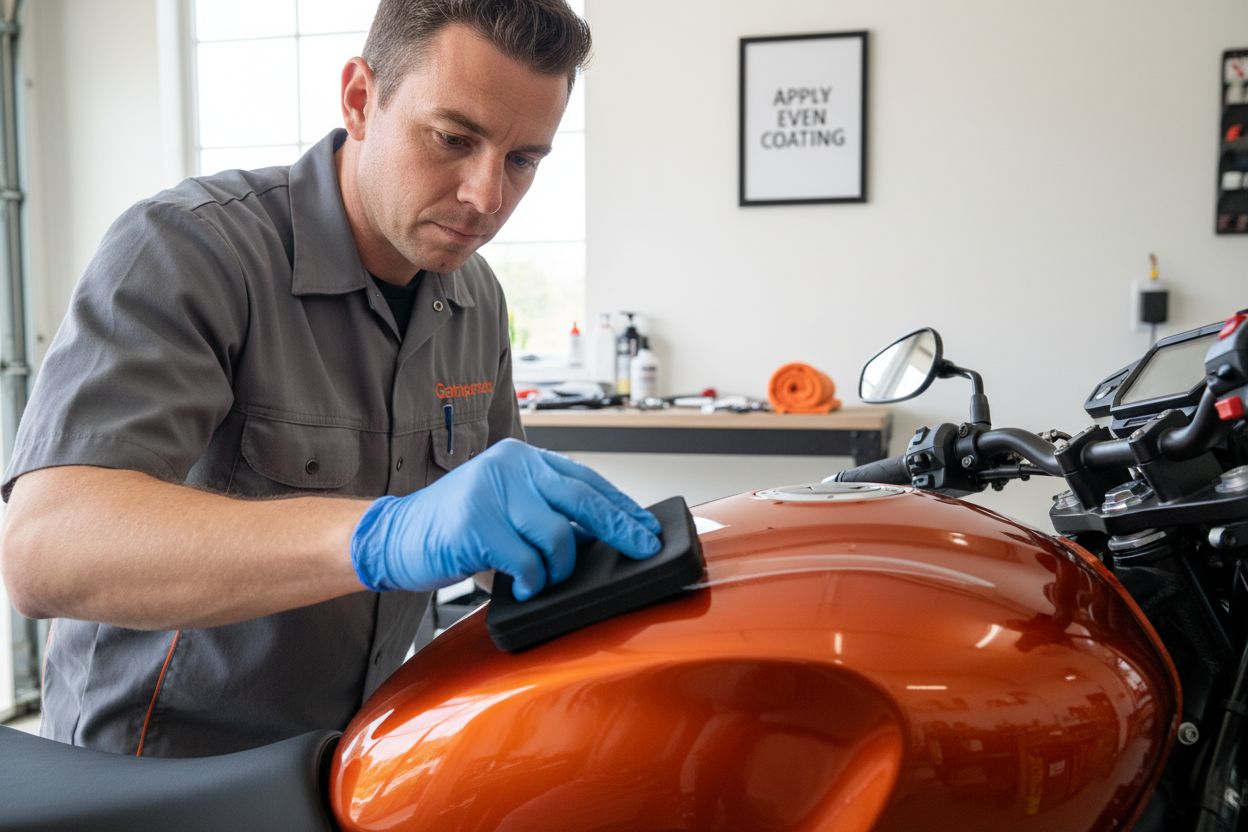
Step 4: Apply the Graphene Coating Evenly
Applying graphene coating requires precision, patience, and a methodical approach to ensure complete and uniform coverage. This critical step transforms your carefully prepared surface into a protected, high performance finish that will resist environmental challenges and maintain its aesthetic appeal.
Start by selecting the right applicator pad, which is crucial for achieving an even distribution. Microfiber or foam applicators designed specifically for graphene coatings work best. Hold the applicator with moderate pressure, using linear and overlapping motions to prevent missed spots or uneven application. Work in small sections approximately 2 square feet at a time to maintain control and consistency.
Begin your application in the least exposed area and move systematically across the surface. Apply the graphene coating using light, consistent strokes with minimal product. Remember that more product does not mean better protection. Thin, even layers create a more durable and effective protective coating. Avoid excessive pressure or saturating the surface, which can lead to uneven coverage or pooling.
Explore our professional graphene coating techniques to understand the nuanced application process. As you work, maintain a consistent angle and direction with your applicator. For curved or complex surfaces, adjust your technique to ensure complete coverage without creating thick or thin zones.
Pay special attention to edges, seams, and intricate areas where coating can easily be missed. Use the corner or edge of your applicator pad to carefully work product into these challenging regions. Some professionals recommend using a separate, smaller applicator for these detailed sections to ensure precision.
Verify your application through a visual and tactile inspection. The graphene coating should appear uniformly glossy without streaks, high spots, or uneven reflection. Gently run your gloved hand across the surface to check for smoothness and consistency. If you notice any imperfections, wait for the initial layer to dry completely before attempting a light, corrective application.
Allowing proper curing time is essential. Most graphene coatings require a specific duration to bond correctly with the surface. Avoid touching or exposing the coated surface to moisture or contaminants during this critical period. Follow the manufacturer’s recommended curing instructions precisely to maximize the coating’s protective qualities and longevity.
Step 5: Allow the Coating to Cure
The curing process is a critical phase that transforms your freshly applied graphene coating from a liquid layer into a robust, protective shield. Understanding and executing this step correctly determines the ultimate performance and durability of your protective coating.
Environmental conditions play a crucial role during the curing period. Maintain a stable environment with controlled temperature between 65 and 75 degrees Fahrenheit. Avoid direct sunlight, high humidity, or areas with significant air movement that could introduce dust or debris. Ideally, choose an indoor space with consistent temperature and minimal environmental fluctuations.
Explore our professional maintenance guidelines to understand the nuanced curing process. Most graphene coatings require an initial soft cure period of 12 to 24 hours where the surface should remain completely untouched. During this time, the coating begins its molecular bonding process, establishing a strong foundation for long term protection.
After the initial soft cure, the coating enters a hard cure phase which can take anywhere from 48 to 72 hours. Throughout this period, keep the coated surface away from water, cleaning products, and physical contact. The coating continues to develop its full protective characteristics during this time, so patience is key. Resist the temptation to test or touch the surface prematurely.
Monitor the curing environment closely. Temperature and humidity sensors can help you maintain optimal conditions. Sudden temperature changes or high moisture levels can compromise the coating’s integrity. If possible, use a dehumidifier to control ambient moisture and maintain a consistent environment.
Verify the curing process by performing a visual and tactile assessment. Once the recommended curing time has elapsed, the surface should appear uniformly glossy with a smooth, glass like finish. Gently run your gloved hand across the surface to check for consistent texture. There should be no tackiness, unevenness, or visual imperfections.
Remember that proper curing is not just about waiting but creating the right conditions for your graphene coating to develop its maximum protective potential. Each hour of careful curing contributes to a finish that will provide exceptional protection and maintain its aesthetic appeal for years to come.
Step 6: Test the Coating for Quality and Durability
Testing your graphene coating is the final crucial step that confirms the success of your application and ensures the protective layer meets professional standards. This verification process helps identify any potential issues and validates the coating’s performance before exposing it to real world conditions.
Visual inspection serves as the first comprehensive assessment of your graphene coating. Use bright, direct light to examine the surface from multiple angles. Look for uniform reflection, consistent gloss, and absence of streaks, high spots, or uneven areas. The coating should display a smooth, glass like finish with no visible imperfections. Any irregularities detected at this stage might indicate the need for a minor touch up or potential reapplication.
Learn more about professional surface protection techniques to understand advanced testing methods. Conduct a water contact angle test by carefully placing a small water droplet on the coated surface. A high quality graphene coating will cause water to bead up immediately and roll off without spreading. This demonstrates the coating’s hydrophobic properties and indicates successful molecular bonding.
Perform a hardness and scratch resistance test using a soft microfiber cloth. Gently drag the cloth across a small, inconspicuous area with minimal pressure. A properly applied graphene coating should maintain its integrity without showing immediate signs of wear. Professional grade coatings typically demonstrate exceptional resistance to light abrasion.
As noted in scientific research, advanced graphene coating analysis involves microscopic structural verification, but for DIY applications, practical testing suffices. Temperature and environmental resistance can be assessed by observing the coating’s performance under different conditions. Monitor how the surface responds to sunlight, humidity, and temperature variations over the first few weeks.
To comprehensively verify your coating’s quality, document your application process and testing results. Take clear photographs documenting the coating’s initial appearance and periodically review these images to track its long term performance. Pay attention to any changes in gloss, water repellency, or surface smoothness over time.
This table provides an overview of all main steps in the graphene coating process, including estimated time and the primary outcome you should expect from each step.
| Step | Estimated Time | Key Outcome |
|---|---|---|
| Gather Necessary Tools and Materials | 10-20 minutes | All materials ready for efficient workflow |
| Clean the Surface Thoroughly | 30-60 minutes | Contaminant-free, pristine application base |
| Prepare the Graphene Coating Solution | 5-10 minutes | Uniform, properly-mixed solution |
| Apply the Graphene Coating Evenly | 20-40 minutes | Uniform coverage with no missed spots |
| Allow the Coating to Cure | 12-72 hours | Fully bonded, durable protective layer |
| Test the Coating for Quality and Durability | 10-20 minutes | Verified long-term performance and finish |
Remember that a successful graphene coating provides more than aesthetic enhancement. It creates a protective barrier that shields your surface from environmental challenges, maintaining its appearance and structural integrity for years to come.
Ready to Experience Professional Graphene Protection?
You just learned the precise steps and importance of achieving a flawless, durable graphene coating. Many struggle with uneven finishes, weak adhesion, and wasted time because they lack the right solutions and products. If you want your motorcycle, car, or surface to look stunning and stay protected for years, it is time to rely on expertly developed nano-coatings and advanced cleaning products.

Our team at ShinyKings offers world-unique graphene coatings engineered for simple application and professional results. Prevent flaws, boost gloss, and enjoy unbeatable surface durability with solutions trusted around the world. Make your next coating project easier and guarantee long-lasting beauty—get started with our graphene coating and cleaning products today. For ongoing tips and guides about surface maintenance, explore our expert articles such as motorcycle maintenance advice and more. Visit ShinyKings now and achieve the flawless finish your surface deserves.
Frequently Asked Questions
What tools do I need to apply graphene coating?
To apply graphene coating effectively, you will need microfiber towels, surface preparation materials like high concentration isopropyl alcohol, applicator pads, and protective gear such as nitrile gloves and safety glasses. Gather these tools before starting to ensure a smooth application process.
How do I clean the surface before applying graphene coating?
Thoroughly clean the surface using high concentration isopropyl alcohol and multiple clean microfiber towels. Work in small sections with linear motions to eliminate contaminants and verify your cleaning by performing a final white towel test.
What is the ideal environment for applying graphene coating?
Apply graphene coating in a stable environment with temperatures between 60 and 75 degrees Fahrenheit and minimal air movement. This helps achieve optimal adhesion and prevents contamination during application.
How do I ensure an even application of graphene coating?
To achieve an even application, use microfiber or foam applicator pads and work in small sections, applying thin layers with moderate pressure and overlapping strokes. Avoid excessive product, as more doesn’t equate to better protection.
How long should I allow the graphene coating to cure?
Allow the coating to cure for at least 12 to 24 hours for the soft cure, followed by 48 to 72 hours for the hard cure. During this time, avoid touching or exposing the surface to moisture to ensure optimal bonding and durability.
How can I test the quality of my applied graphene coating?
Perform a visual inspection under bright light to check for uniformity and gloss, and conduct a water contact angle test to see if water beads up without spreading. Document any changes in appearance or performance over time to track its durability.