


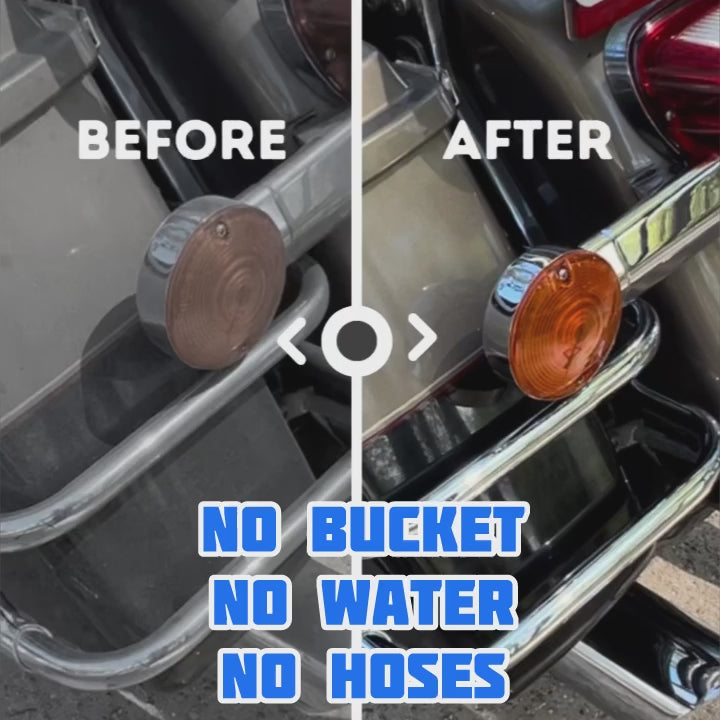
How to Seal Your Driveway Like a Pro (DIY Guide)
Watch the Video of how to Seal your Driveway, Patio and Paver like a Pro:
Why You Should Seal Your Driveway
A concrete driveway might seem tough — and it is — but over time, even the hardest surface begins to wear down under daily exposure to the elements. Most homeowners don't realize how much damage is slowly being done until it's too late. Rain, sun, dirt, oil, salt, algae, and even just the friction from your tires all contribute to the gradual breakdown of the surface. Left unprotected, a driveway becomes a sponge — absorbing moisture, oil, grime, and contaminants that can weaken it from the inside out.

The most immediate signs are familiar: faded appearance, dark stains that won’t wash out, small cracks appearing at the joints or edges, and eventually pitting or scaling where concrete starts to chip away. In colder regions, the freeze-thaw cycle is especially brutal. Water seeps into micro-cracks and pores, freezes, expands, and causes those cracks to widen every winter. In hot, dry climates, UV rays bleach the concrete and cause the top layer to become brittle and dusty. In humid areas, the surface becomes slippery and green with algae, mold, or mildew. It’s a slow process — but it adds up fast.
That’s where sealing comes in.
A high-quality driveway sealer acts like a shield. When applied correctly, it blocks water, oils, dirt, de-icing salts, and organic growth from penetrating the surface. Instead of absorbing into the concrete, contaminants sit on top — making it easier to clean and preventing long-term damage. The result isn’t just cosmetic. You’re extending the lifespan of the entire structure, reducing maintenance, and protecting your curb appeal. It’s like applying sunscreen and moisturizer to your skin — one protects from the outside, the other from deep within.
But not all sealers are created equal. Some barely last a season. Others leave the surface looking patchy or greasy. That’s why choosing the right type of sealer — and applying it the right way — makes all the difference. Done correctly, sealing your driveway doesn’t just restore a clean, finished look. It becomes a long-term investment in the health of your home’s most-used surface.
💡 Think of it this way: You wouldn’t leave your car’s paint unprotected. Why do the same for the surface you park it on every day?
What Makes a Good Sealer? (The 2-Phase Difference)
Walk down the aisle at any big-box hardware store, and you’ll see a dozen types of concrete sealers, all promising to “protect,” “revive,” or “restore” your driveway. But what they don’t tell you is that most sealers only do half the job — and many fail within weeks of application. Understanding what makes a sealer truly effective is the difference between a surface that looks good for a season… and one that stays protected for years.
Let’s break it down:
Most cheap sealers are single-phase solutions. That means they sit on the surface and form a thin protective film. It looks good initially — often giving a shiny wet-look — but that layer is superficial. It doesn’t bond with the concrete below, and it doesn’t penetrate. After a few months (or even weeks), weather, traffic, and cleaning wear it away. Once that happens, your concrete is vulnerable again, and you’re back to square one — resealing, scrubbing stains, and wondering why it didn’t last.
Now compare that with a professional-grade 2-phase sealer like the one we use at ShinyKings.

Phase 1: Deep Penetration
This is where the real protection happens. The sealer penetrates deep into the pores of the concrete — we’re talking millimeter-level absorption — and chemically bonds inside the surface structure. It doesn’t just coat the concrete; it becomes part of it. This invisible barrier blocks water, oil, de-icing salt, algae spores, and other contaminants at the root. It can’t be washed away. It doesn’t peel. And it stays active long after the surface gloss fades.
Phase 2: Surface Sealing
This phase creates the visible water-beading and easy-clean benefits that most people recognize. It also enhances color slightly, depending on the finish, and gives that rich, “just-cleaned” look. This surface layer naturally wears over time — typically 4 to 6 months under normal conditions — but it’s easy to top up with a refresher spray. And while many sealers fail completely once this outer layer breaks down, our deep barrier remains intact, continuing to protect where it matters most.
💡 Think of it like car care: Wax makes the surface shine, but it’s the ceramic coating underneath that truly protects.
This dual-action formula is what sets apart long-lasting sealers from short-term fixes. And it’s not just marketing. You can see it in how water beads on the surface after months of use, how algae wipes away with a cloth, and how the concrete stays brighter and cleaner between washes — even in harsh weather or high-traffic areas.
So, if you’re asking, “What’s the best concrete driveway sealer?” The answer isn’t just about price or finish. It’s about whether that product protects below the surface — and whether it gives you real-world results that last beyond the first rainstorm.
🛒 Explore our Driveway Sealer Collection for full-depth nano protection that does more than just shine.
The Cost of NOT Sealing Your Driveway
A lot of homeowners put off sealing their driveway. Sometimes it’s because they think concrete is strong enough to last on its own. Other times, it’s just something that gets pushed down the to-do list — especially when the surface “doesn’t look that bad.”
But here’s the truth: an unsealed driveway is quietly costing you more than you think.
Concrete is porous by nature. It might feel hard as rock, but it absorbs moisture, oil, and grime like a sponge. Left unprotected, every rainfall, oil drip, or bag of fertilizer you set down is slowly soaking in. Over time, that buildup leads to cracks, flaking, stains, and the dreaded green slime in shady corners. And the longer you wait, the more expensive the repairs become.
Let’s break it down with real numbers:
| Problem | Estimated Cost |
|---|---|
| Concrete crack repair | $400–$1,200 (depending on size) |
| Preassure washing to remove stains, dirt, Algae and mold remediation |
$150–$500 per treatment normally once a year |
| Surface resurfacing | $2,000–$4,500 |
| Driveway tear-out and replacement | $6,000–$12,000+ |
Now compare that with the average cost of a premium concrete sealer:
- $69–$169, depending on the size of your driveway
When you look at it from a long-term perspective, sealing your driveway isn’t a cost — it’s a savings plan. For less than a couple of tanks of gas, you can prevent thousands of dollars in repairs. Not to mention the time and frustration of trying to power wash stains that won’t budge, or pressure-treat algae patches that keep coming back.
And it’s not just about damage. A sealed driveway looks noticeably better. It boosts curb appeal, maintains your home’s exterior value, and gives guests — or potential buyers — the impression that your entire property is well cared for. It’s one of the easiest upgrades you can make for both aesthetics and function.
💡 Fun fact: Real estate agents often recommend sealing a driveway before listing a house. It’s one of the top ROI exterior improvements under $500.
So while sealing your driveway might feel like one of those “optional chores,” the real cost comes when you don’t do it — and end up paying 10x more to fix what could have been prevented.
Step-by-Step: How to Seal a Driveway (The Right Way)
Sealing your driveway isn’t complicated, but there’s a world of difference between doing it quickly… and doing it right. Proper preparation and technique are the keys to long-lasting results. Here’s your detailed, no-nonsense guide to sealing like a pro — even if it’s your first time.
Step 1: Inspect and Repair the Surface
Before you even think about opening a sealer bottle, take 15–30 minutes to inspect your driveway. Walk the entire surface, preferably in daylight after a dry day, and check for:
- Hairline cracks: These may look harmless now, but if moisture enters and freezes, they’ll widen and eventually break up the surface. Use a flexible crack filler made for concrete.
- Deeper cracks and potholes: These need a patching compound. Clean them out thoroughly and follow product directions for curing.
- Chips, spalling, or loose gravel: Use a resurfacer to even out damaged areas and prevent further wear.
Let all repairs cure fully — usually 24 to 48 hours depending on product and weather.
🔍 Tip: Skipping this step is one of the biggest reasons sealers fail early. Sealing over cracks just locks in the problem.
Step 2: Clean the Surface (Really Clean It)
You’d be surprised how many sealing jobs go bad just because the surface wasn’t cleaned properly. Concrete may look dry and solid, but it holds onto microscopic layers of oil, mildew, and dust that can prevent the sealer from bonding.
Here’s what to do:
- Sweep off all leaves, dirt, and debris
- Degrease oil spots using a concrete degreaser and stiff bristle brush
- Pressure wash the entire driveway slowly and evenly
- Rinse thoroughly and allow all water to run off
Drying time: Let your driveway dry for 24 to 48 hours after washing. In humid conditions, give it more time.
⚠️ Warning: Applying sealer to damp concrete traps moisture and can cause hazing or blistering. A completely dry surface is critical.
Step 3: Choose the Right Sealer
Let’s be honest — not all sealers are worth your time. You want a two-phase, water-based penetrating sealer that:
- Bonds inside the concrete
- Resists water, salt, oil, and algae
- Leaves no greasy residue or slippery finish
- Is safe for pets, plants, and your lawn
✅ We recommend the ShinyKings Driveway Sealer — engineered with nano-technology that protects from deep within while also providing surface water repellency.
Step 4: Gather the Right Tools
You’ll need:
- Pump sprayer with a fan tip nozzle
- Optional: 9" roller with extension pole
- Painter’s tape or plastic for masking
- Gloves, safety glasses, and mask
- Cardboard or drop cloth to protect borders or garage doors
💡 Pro Tip: A roller helps if your surface is very textured or if you want to back-roll after spraying.
Step 5: Apply the Sealer
Now the fun begins.

- Start early to avoid direct midday sun
- Mask edges near bricks, walls, or flower beds
- Pour the sealer into your sprayer and pump to pressurize
- Spray in 4–6 ft sections, overlapping slightly
- Keep the sprayer moving to avoid puddling
- Let it soak in for 10–15 minutes
- Optional: Use a roller to even out and remove excess

🕓 For most driveways, 1 coat is enough. Very porous concrete may benefit from a second coat after the first is touch-dry.
⚠️ Reminder: Don’t apply too thick. This isn’t paint — it needs to soak in, not build up.
⏳ Step 6: Curing and Aftercare
Now it’s time for patience. Here’s your curing guide:
| Traffic Type | Wait Time |
|---|---|
| Light foot traffic | 4–6 hours |
| Vehicle traffic | 24–48 hours |
| Full cure | 72 hours |
Avoid:
- Driving or dragging heavy bins before fully cured
- Washing or hosing the surface for 3–5 days
- Rain or moisture exposure during curing
🌧️ Pro Tip: If rain is in the forecast within 24 hours, reschedule. Let the sealer cure in dry, mild conditions for best results.
Common Mistakes to Avoid When Sealing a Driveway
Even though sealing a driveway is a relatively straightforward process, it’s easy to overlook critical steps — especially if you’re rushing, using the wrong tools, or trusting advice from YouTube shortcuts. The problem is, these mistakes often don’t show up until weeks or months later… when your driveway starts peeling, looking patchy, or worse, cracking again.
Here’s a list of the most common errors we see — and exactly how to avoid them.
Mistake #1: Sealing a Dirty or Contaminated Surface
This is by far the number one reason sealers fail. Even if your concrete looks clean, it could still have invisible layers of oil, algae spores, tire residue, or dust trapped in its pores. Sealing over that grime locks it in — preventing the sealer from bonding with the concrete. Over time, the seal will lift, blister, or wear unevenly.
How to avoid it: Power wash the surface thoroughly, treat oil spots with degreaser, scrub algae or mildew, and allow at least 24–48 hours for the surface to dry before applying sealer. If in doubt, wait longer.
Mistake #2: Applying the Sealer Too Thick
More is not better when it comes to concrete sealer. Overapplication leads to tacky, blotchy spots that may never cure properly. It can also cause slippery surfaces, dust collection, or a cloudy “hazed” appearance.
How to avoid it: Apply thin, even coats using a pump sprayer with a fan tip. Let it absorb naturally. If a second coat is needed, apply it after the first coat is touch dry, usually 1–2 hours later.
Mistake #3: Sealing While the Concrete is Damp
Moisture trapped in the concrete prevents the sealer from soaking in. The result? Peeling, flaking, or white hazy patches that look like frost. Worse, the trapped moisture can cause bubbles under the surface, especially in hot weather.
How to avoid it: Only seal after a minimum of 24–48 hours of dry weather. Do a test: tape a 12x12" piece of plastic onto the concrete for 2 hours. If you see condensation, it’s too wet.
Mistake #4: Not Repairing Cracks Before Sealing
Sealing over cracks doesn’t fix them — it just hides them temporarily. Water can still seep in, freeze, and make the cracks worse from below. Over time, this causes scaling, edge breakdown, and costly repairs.
How to avoid it: Use a high-quality crack filler or patch compound made specifically for concrete. Let it fully cure before sealing.
Mistake #5: Using the Wrong Sealer for the Job
There’s a reason pros don’t use the $30 big-box brand on driveways. Many over-the-counter sealers are solvent-based or low-grade acrylics designed for indoor use, colored concrete, or stamped overlays — not driveways exposed to oil, weight, and weather.
How to avoid it: Choose a penetrating, breathable, water-based sealer like ShinyKings’ nano-technology formula. It’s made specifically for outdoor concrete, stone, and pavers.
Mistake #6: Sealing in the Wrong Weather Conditions
Trying to rush a sealing job because of the weather forecast is a common error. Extreme heat causes flash drying, while cold or humid conditions slow down curing. Rain can ruin the finish entirely.
How to avoid it: Apply in dry, mild weather between 55°F and 80°F. Avoid sealing in direct sun. Early morning or late afternoon works best.
💡 Pro Tip: The perfect sealing day is a warm, dry, overcast day with low humidity and a light breeze.
By avoiding these mistakes, you’ll dramatically improve how long your sealer lasts — and how good your driveway looks. You’ll also avoid common headaches like resealing every year, wasting money on ineffective products, or having to power wash out flaky coatings and start over.
If you’ve ever seen a driveway that’s blotchy, slippery, or already showing algae again just months after sealing — chances are, one of these errors was the cause.
How to Tell It’s Time to Reseal Your Driveway
Even the best concrete sealers don’t last forever. Over time, UV rays, heavy rainfall, car traffic, and simple wear gradually break down the surface layer of your sealer. But how do you know when it’s time to reseal? Most homeowners wait too long — and end up resealing only after stains, algae, or cracks have already taken hold.
Instead of guessing, here are the key signs that it’s time to reseal your driveway — before damage sets in:
1. Water No Longer Beads on the Surface
This is the easiest test. Grab a glass of water and pour it on your driveway. If the water instantly beads up and runs off, your sealer is still doing its job.

But if the water soaks into the concrete and darkens it — even slightly — your surface protection is gone.
✅ Reseal when beading disappears, even if the surface still looks clean.
2. The Surface Looks Dull or Dusty
A properly sealed driveway should look smooth, even-toned, and slightly enriched in color. If yours is starting to look chalky, faded, or patchy — especially in the wheel paths — the sealer has likely worn away unevenly.
✅ Reseal to refresh the surface finish before stains get locked in.
3. Algae, Mold, or Mildew Are Returning
Driveways in humid, shady, or coastal regions are especially prone to green or black discoloration. A good sealer prevents organic growth by blocking moisture from soaking into the surface.
✅ Reseal before buildup returns and requires heavy cleaning.
4. Oil Stains Aren’t Wiping Off Like They Used To
When your sealer is fresh, spills stay on the surface and wipe off easily. But when it’s worn out, even small drips soak into the pores, leaving behind dark, greasy marks.
✅ If cleaning your driveway is becoming harder, it’s time to reseal.
5. It’s Been More Than 2–3 Years
Even if you don’t see visual damage yet, your sealer may already be wearing thin — especially in high-traffic areas. Most premium sealers last between 24–48 months. Budget products often fail after 6–12 months.
✅ Reapply surface protection every 2 years, deep protection every 3–4 years.
🧼 Pro Tip: Don’t wait until you see damage — make sealing part of your seasonal maintenance routine.
Frequently Asked Questions (FAQs)
🔹 Can I seal a brand-new concrete driveway?
Yes — but freshly poured concrete needs to cure before sealing. This usually takes 28–30 days. Sealing too early can trap moisture and interfere with bonding.
✅ Wait at least 1 month after pouring before sealing.
🔹 What’s the best time of year to seal a driveway?
Spring and fall are ideal. You want:
- Dry weather
- Mild temperatures (55°F to 75°F)
- Low humidity
- No rain for 24 hours
🔹 Can I apply this over an existing sealer?
Yes — if the old sealer is water-based, in good condition, and the surface is clean. If the old layer is flaking or solvent-based, remove it first. Always test a small area first.
🔹 Does the sealer make the surface slippery?
Our nano-based sealer doesn’t leave a greasy film. It preserves the natural texture while adding water repellency. Wet-look products may be slicker when wet — use penetrating sealers for max traction.
🔹 Is your sealer safe for pets, plants, or lawns?
Yes. Once cured, our water-based sealer is non-toxic and eco-friendly. It’s safe around garden beds, pets, and kids.
🔹 Can I use this on other surfaces?
Absolutely. Shinykings sealers work on any absorbent Stone or Concrete Surface:
- Driveways
- Patios
- Pavers
- Walkways
- Garage floors
- Pool decks
- Concrete stairs
✅ As long as the surface is porous concrete or stone, it’s compatible.
Final Thoughts: Do It Once. Do It Right.
Sealing your driveway isn’t just another weekend chore — it’s one of the most cost-effective ways to protect your home’s exterior, preserve your investment, and save yourself time, money, and frustration down the road.
Think about what your driveway goes through every day: sun, rain, dirt, oil, heat, cold, tire friction, and everything that washes off your car. It’s the most heavily used — and abused — surface on your property. Yet it’s often the most neglected. Until one day, you step outside and realize it looks stained, cracked, and tired. But it doesn’t have to be that way.
By following the step-by-step process in this guide, using the right tools, and most importantly, choosing a high-quality two-phase sealer, you can:
- Extend the life of your driveway by years
- Prevent costly repairs like cracks and surface flaking
- Repel stains from oil, dirt, algae, and mildew
- Maintain a fresh, clean, curb-appealing look
- Cut cleaning time in half (or more)
Best of all? You can do it yourself in just a few hours. No contractor. No waiting. No massive expense.
But the secret is in the product. Most sealers only protect the surface — and even that breaks down quickly. Ours goes deeper. With Shinykings' Nano-Based 2-Phase Sealers like SP5000 or Nanoprotect, you get:
- A deep-penetrating layer that locks out water and grime from within
- A long-lasting surface layer that keeps dirt off and shine on
- Easy top-up with our booster spray every 6–12 months
- Eco-safe, non-toxic, U.S.-developed performance you can trust
💬 “I’ve sealed my driveway before — but this was the first time it actually stayed clean all year.” – Verified Customer
✅ Ready to Protect Your Driveway?
Explore our full line of DIY-friendly, high-performance sealers:
👉 Shop the Driveway Sealer Collection »
Includes:
- 1 gallon ready to use packs or 32 oz Concentrate equals 2.64 GAL for most home driveways
- Booster kits for quick reapplication
- Use every common pump sprayer
- Free U.S. shipping on orders over $40
Bonus: Join Thousands of Homeowners Who Made the Switch
Tens of thousands of people across the U.S. and Europe have already sealed their driveways with Shinykings products. They're saving time. They’re skipping the pressure washing. And they’re enjoying a better-looking home every day.
It’s your turn.
Protect it once. Keep it clean for years. Life made simple - That’s the Shinykings way.